If you use Hashicorp’s Consul for service discovery/DNS and use (or plan to use) Kubernetes, then the recently announced integration between Consul and Kubernetes will come as welcome news!

The syncing can be done by running a process that is not part of the Kubernetes cluster itself; in Hashicorp’s consul-k8s project, or, preferably, by installing the Consul-Helm Chart.
Hashicorp released a Consul-Helm Chart for installing, configuring, and upgrading Consul on Kubernetes.
There are decisions to be made regarding the nature of the syncing, but the first step would always be to clone the Consul-Helm project.
Before installing the Helm Chart, let’s review some of the essential configurations that are found in the standard helm values file, “values.yaml”.
Configure consul-helm
By default, the Chart resolution installs everything: a Consul server cluster, client agents on all nodes, and feature components.
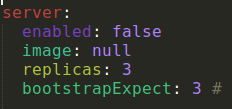
If you already maintain a Consul cluster and are interested in joining the Kubernetes services to your existing cluster, then the “enable” property in the “server” section should be set to “false”:
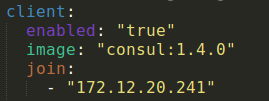
We’ll also need to enable the Consul client and tell it what the Consul-server address is, so it can join the cluster:
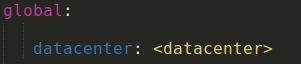
We’ll also need to specify the datacenter:
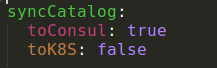
Now we have to choose whether to sync to Kubernetes or Consul (or both!).
Sync to Consul means that the Kubernetes services will appear in the Consul catalog, and they could be available via HTTP or Consul-DNS. Later on, we’ll describe how to configure that.
If you already maintain a Consul cluster, you probably want to sync to Consul.
Sync to Kubernetes means that services in Consul can be made available as first-class Kubernetes services, and thus able to access them through Kubernetes Core-DNS or with any Kubernetes way. If you are not planning on using it, you might want to set the sync to Kubernetes to “false”, since you might get lost with all the Consul services that would suddenly appear as Kubernetes’ components. If you enable it for every namespace, well, it can really get messy.
For example, in the image below we’ll define a syncing to Consul and not to Kubernetes.
I recommend going over the entire “values.yaml” file and set the relevant values.
Now for the installation itself:
Clone the repository from here and perform “helm install”.
Accessing the Consul HTTP API
Access to the Consul HTTP API is through the consul-agent, Pod, we’ve created.
Every Node has a Consul agent, and there are a couple of ways to expose access to them.
One way is to create a Nodeport service. A Nodeport defines a static port, meaning that it opens a specific port on all nodes so any traffic from the outside to this port would get to this service.
The service, in turn, would forward traffic to an application labeled “consul”, which is a Consul agent.
Below is an example of such Consul Service. ‘Kubectl apply’ it to spin the service.
apiVersion: v1
kind: Service
metadata:
  labels:
    app: consul
  name: consul-http-api
  namespace: <namespace>
spec:
  selector:
    app: consul
    hasDNS: "true"
    release: consul
  ports:
  - name: http-api
    protocol: TCP
    port: 8500
    targetPort: 8500
  type: NodePort
Configure the Consul domain with the CoreDNS
CoreDNS is a DNS server that commonly serves as the Kubernetes cluster DNS. It can be configured via its “Corefile”, which is defined in the “coredns” ConfigMap. If we like to use the Consul-DNS to call our external Consul services from a Kubernetes component (instead of or along the CoreDNS addresses for Kubernetes services), we’ll need to configure Consul in the “Corefile” section.
In the CoreDNS .yaml file below, the “consul:53” section is what we are interested in.
To force all non-cluster DNS lookups to go through our consul-sync Kubernetes service so we will be able to use the Consul names. The key “consul:53” means that names that end with the string “consul” will go through the consul-sync service. Since the address of the Consul services is of this template:
<service name>.service.<datacenter name>.consul
This is exactly what we want.
apiVersion: v1
kind: ConfigMap
metadata:
 name: coredns
 namespace: kube-system
data:
 Corefile: |
   .:53 {
       errors
       log
       health
       kubernetes cluster.local 10.0.0.0/24
       prometheus :9153
       proxy . /etc/resolv.conf
       cache 30
       reload
   }
   consul:53 {
       log
       errors
       cache 30
       proxy . ${CONSUL_DNS_SERVER_ADDR} {
        # policy round_robin
        # health_check /health:8080
       }
   }
Note that we configured “proxy”. Any queries that are not within the cluster domain of Kubernetes will be forwarded to predefined resolvers, in our case the Consul service.
The address of the Consul service can be invoked with this script:
CONSUL_DNS_SERVER_ADDR=kubectl get svc consul-sync-dns -o jsonpath='{.spec.clusterIP}' -n <namespace>
To reconfigure CoreDNS with the additionals to the ConfigMap, perform:
kubectl get pods -n kube-system -oname |grep coredns |xargs kubectl apply -f kube-system
Configurations of the Consul-K8s sync components are implemented as Jenkins-Pipeline methods on my GitHub.